
正文
android+myeclipse+mysql下拉框数据绑定
【扫一扫了解最新限行尾号】
复制小程序
原创作品,允许转载,转载时请务必声明作者信息和本声明。http://www.cnblogs.com/zhu520/p/8027036.html
本人小白,那个大神看到有问题可指出,谢谢。。。。
一:我使用的工具 myeclipse ,mysql ,Android studio
二:服务器(后台)myeclipse
 =========
 ========》
1):先配置先
a: web.xml
这里的 <servlet-mapping> 我多设置一个 <url-pattern>*.json</url-pattern>用来区分是前台还是后台,这是我的习惯,你也可以不要,自己喜欢
<?xml version="1.0" encoding="UTF-8"?>
<web-app version="3.0" xmlns="http://java.sun.com/xml/ns/javaee"
xmlns:xsi="http://www.w3.org/2001/XMLSchema-instance"
xsi:schemaLocation="http://java.sun.com/xml/ns/javaee
http://java.sun.com/xml/ns/javaee/web-app_3_0.xsd">
<display-name></display-name> <context-param>
<param-name>contextConfigLocation</param-name>
<param-value>classpath:applicationContext.xml, classpath:spring-mybatis.xml</param-value>
</context-param> <listener>
<description>spring监听器</description>
<listener-class>org.springframework.web.context.ContextLoaderListener</listener-class>
</listener> <servlet>
<description>spring mvc servlet</description>
<servlet-name>springMvc</servlet-name>
<servlet-class>org.springframework.web.servlet.DispatcherServlet</servlet-class>
<init-param>
<description>spring mvc 配置文件</description>
<param-name>contextConfigLocation</param-name>
<param-value>classpath:spring-mvc.xml</param-value>
</init-param>
<init-param>
<param-name>activeReverseAjaxEnabled</param-name>
<param-value>true</param-value>
</init-param>
<load-on-startup>1</load-on-startup>
</servlet><servlet-mapping>
<servlet-name>springMvc</servlet-name>
<!-- 此处配置成*.do,对应struts的后缀习惯 -->
<url-pattern>*.do</url-pattern> <!-- 此处配置成*.json,是为了能够截获"../*.json"格式的访问(例如android客户端) -->
<url-pattern>*.json</url-pattern>
</servlet-mapping> <filter>
<filter-name>characterEncodingFilter</filter-name>
<filter-class>org.springframework.web.filter.CharacterEncodingFilter</filter-class>
<init-param>
<param-name>encoding</param-name>
<param-value>UTF-8</param-value>
</init-param>
<init-param>
<param-name>forceEncoding</param-name>
<param-value>true</param-value>
</init-param>
</filter> <filter-mapping>
<filter-name>characterEncodingFilter</filter-name>
<url-pattern>/*</url-pattern>
</filter-mapping> <welcome-file-list>
<welcome-file>index.jsp</welcome-file>
</welcome-file-list></web-app>
web.xml
b: applicationContext.xml
<?xml version="1.0" encoding="UTF-8"?>
<beans
xmlns="http://www.springframework.org/schema/beans"
xmlns:xsi="http://www.w3.org/2001/XMLSchema-instance"
xmlns:p="http://www.springframework.org/schema/p"
xmlns:context="http://www.springframework.org/schema/context"
xmlns:aop="http://www.springframework.org/schema/aop"
xmlns:tx="http://www.springframework.org/schema/tx"
xsi:schemaLocation="
http://www.springframework.org/schema/tx
http://www.springframework.org/schema/tx/spring-tx-3.1.xsd
http://www.springframework.org/schema/aop
http://www.springframework.org/schema/aop/spring-aop-3.1.xsd
http://www.springframework.org/schema/context
http://www.springframework.org/schema/context/spring-context-3.1.xsd
http://www.springframework.org/schema/beans
http://www.springframework.org/schema/beans/spring-beans-3.1.xsd">
<!-- 开启注解 -->
<context:annotation-config />
<!-- 自动扫描 -->
<context:component-scan base-package="zhu.dao,zhu.service">
<context:include-filter type="annotation" expression="org.springframework.stereotype.Repository" />
<context:include-filter type="annotation" expression="org.springframework.stereotype.Service" />
</context:component-scan>
</beans>
applicationContext.xml
c:jdbc.properties ==>这里的链接mysql ,数据库记得改,看自己的是那个数据库每次
driverClassName=com.mysql.jdbc.Driver
url=jdbc\:mysql\://localhost\:3306/jdbc01?useUnicode\=true&characterEncoding\=utf-8
username=root
password=root
validationQuery=SELECT 1
# \u6570\u636e\u5e93\u914d\u7f6e
jdbc.driverClass=com.mysql.jdbc.Driver
jdbc.url=jdbc\:mysql\://localhost\:3306/jdbc01?useUnicode\=true&characterEncoding\=utf-8&zeroDateTimeBehavior\=convertToNull
jdbc.user=root
jdbc.password=root
#\u5305\u6587\u4ef6\u4f4d\u7f6e
targetProject=THIS4
package.model=zhu.po
package.sql.mapper=zhu.mapper
package.dao.mapper=zhu.dao
jdbc.properties
d:log4j.properties
##### \u65e5\u5fd7\u914d\u7f6e\u8d44\u6e90\u6587\u4ef6\uff1a
##### \u63cf\u8ff0\u65e5\u5fd7\u8bb0\u5f55\u76f8\u5173\u914d\u7f6e\u4fe1\u606f
log4j.rootCategory=INFO,stdout,logfilelog4j.rootLogger=info,stdoutlog4j.appender.stdout=org.apache.log4j.ConsoleAppender
log4j.appender.stdout.Target=System.out
log4j.appender.stdout.layout=org.apache.log4j.PatternLayout
log4j.appender.stdout.layout.ConversionPattern=%d{yyyy-MM-dd HH:mm:ss} %c{1}:%L %5p - %m%nlog4j.logger.com.netqin=INFO
log4j.logger.org.springframework=INFOlog4j.appender.logfile=org.apache.log4j.DailyRollingFileAppender
log4j.appender.logfile.DatePattern='.'yyyy-MM-dd
log4j.appender.logfile.File=F\:/S3S3M3.log
log4j.appender.logfile.layout=org.apache.log4j.PatternLayout
log4j.appender.logfile.layout.ConversionPattern=%d %p [%X{userName}][%X{userLocale}][%c] - <%m>%n
log4j.properties
f:spring-mvc.xml
<?xml version="1.0" encoding="UTF-8"?>
<beans xmlns="http://www.springframework.org/schema/beans"
xmlns:mvc="http://www.springframework.org/schema/mvc" xmlns:xsi="http://www.w3.org/2001/XMLSchema-instance"
xmlns:p="http://www.springframework.org/schema/p" xmlns:context="http://www.springframework.org/schema/context"
xsi:schemaLocation="http://www.springframework.org/schema/beans
http://www.springframework.org/schema/beans/spring-beans-3.1.xsd
http://www.springframework.org/schema/context
http://www.springframework.org/schema/context/spring-context-3.1.xsd
http://www.springframework.org/schema/mvc
http://www.springframework.org/schema/mvc/spring-mvc-3.1.xsd"> <!-- 自动扫描controller包下的所有类,使其认为spring mvc的控制器 -->
<context:component-scan base-package="zhu.web">
<context:include-filter type="annotation"
expression="org.springframework.stereotype.Controller" />
</context:component-scan> <!-- 日期转换 必须放在<mvc:annotation-driven />前面 -->
<bean
class="org.springframework.web.servlet.mvc.annotation.AnnotationMethodHandlerAdapter"></bean> <!-- 注解方式 -->
<mvc:annotation-driven>
</mvc:annotation-driven> <!-- 启动Spring MVC的注解功能,完成请求和注解POJO的映射 -->
<bean
class="org.springframework.web.servlet.mvc.annotation.AnnotationMethodHandlerAdapter" /> <!--mvc配置视图解析 -->
<!-- 对模型视图名称的解析,即在模型视图名称添加前后缀 -->
<bean class="org.springframework.web.servlet.view.InternalResourceViewResolver" >
<property name="prefix" value="/WEB-INF/"></property>
<property name="suffix" value=".jsp"></property>
</bean>
<!--跳转的时候只用写jsp名字,不用带后缀,因为默认的后缀“.jsp”,路径为“/WEB-INF/jsp” --></beans>
spring-mvc.xml
g:spring-mybatis.xml
<?xml version="1.0" encoding="UTF-8"?>
<beans xmlns="http://www.springframework.org/schema/beans"
xmlns:xsi="http://www.w3.org/2001/XMLSchema-instance" xmlns:p="http://www.springframework.org/schema/p"
xmlns:context="http://www.springframework.org/schema/context"
xmlns:aop="http://www.springframework.org/schema/aop" xmlns:tx="http://www.springframework.org/schema/tx"
xsi:schemaLocation="
http://www.springframework.org/schema/tx
http://www.springframework.org/schema/tx/spring-tx-3.1.xsd
http://www.springframework.org/schema/aop
http://www.springframework.org/schema/aop/spring-aop-3.1.xsd
http://www.springframework.org/schema/context
http://www.springframework.org/schema/context/spring-context-3.1.xsd
http://www.springframework.org/schema/beans
http://www.springframework.org/schema/beans/spring-beans-3.1.xsd"> <!-- ========================================数据库方言========================================= -->
<!-- properties配置文件 -->
<bean id="dbProperties"
class="org.springframework.beans.factory.config.PropertyPlaceholderConfigurer">
<!-- 是否忽略不可解析的 -->
<property name="ignoreUnresolvablePlaceholders" value="true" />
<property name="locations">
<list>
<value>classpath:jdbc.properties</value>
</list>
</property>
</bean> <!-- ========================================数据源配置========================================= -->
<!-- 配置数据源,使用的是alibaba的Druid(德鲁伊)数据源 -->
<bean id="dataSource" class="com.alibaba.druid.pool.DruidDataSource"
init-method="init" destroy-method="close">
<property name="url" value="${url}" />
<property name="username" value="${username}" />
<property name="password" value="${password}" />
<!-- 初始化连接大小 -->
<property name="initialSize" value="0" />
<!-- 连接池最大使用连接数量 -->
<property name="maxActive" value="20" />
<!-- 连接池最大空闲 -->
<property name="maxIdle" value="20" />
<!-- 连接池最小空闲 -->
<property name="minIdle" value="0" />
<!-- 获取连接最大等待时间 -->
<property name="maxWait" value="60000" />
<property name="validationQuery" value="${validationQuery}" />
<property name="testOnBorrow" value="false" />
<property name="testOnReturn" value="false" />
<property name="testWhileIdle" value="true" />
<!-- 配置间隔多久才进行一次检测,检测需要关闭的空闲连接,单位是毫秒 -->
<property name="timeBetweenEvictionRunsMillis" value="60000" />
<!-- 配置一个连接在池中最小生存的时间,单位是毫秒 -->
<property name="minEvictableIdleTimeMillis" value="25200000" />
<!-- 打开removeAbandoned功能 -->
<property name="removeAbandoned" value="true" />
<!-- 1800秒,也就是30分钟 -->
<property name="removeAbandonedTimeout" value="1800" />
<!-- 关闭abanded连接时输出错误日志 -->
<property name="logAbandoned" value="true" />
<!-- 监控数据库 -->
<!-- <property name="filters" value="stat" /> -->
<property name="filters" value="mergeStat" />
</bean> <!-- ========================================MyBatis的配置项============================== -->
<!-- 配置sqlSessionFactory -->
<bean id="sqlSessionFactory" class="org.mybatis.spring.SqlSessionFactoryBean">
<!-- 实例化sqlSessionFactory时需要使用上述配置好的数据源以及SQL映射文件 -->
<property name="dataSource" ref="dataSource" />
<!-- <property name="configLocation" value="classpath:mybatis.cofig.xml" /> -->
<!-- 自动扫描Mybatis的Mapper.xml文件 -->
<property name="mapperLocations" value="classpath:zhu/mapper/*.xml" />
</bean> <!-- 配置扫描器 -->
<bean class="org.mybatis.spring.mapper.MapperScannerConfigurer">
<!-- 扫描zhu.dao这个包以及它的子包下的所有映射接口类 -->
<property name="basePackage" value="zhu.dao" />
<property name="sqlSessionFactoryBeanName" value="sqlSessionFactory" />
</bean> <!-- 配置事务管理器 -->
<bean id="transactionManager"
class="org.springframework.jdbc.datasource.DataSourceTransactionManager">
<property name="dataSource" ref="dataSource" />
</bean> <!-- 拦截器方式配置事物 -->
<tx:advice id="transactionAdvice" transaction-manager="transactionManager">
<tx:attributes>
<tx:method name="add*" propagation="REQUIRED" />
<tx:method name="append*" propagation="REQUIRED" />
<tx:method name="insert*" propagation="REQUIRED" />
<tx:method name="save*" propagation="REQUIRED" />
<tx:method name="update*" propagation="REQUIRED" />
<tx:method name="modify*" propagation="REQUIRED" />
<tx:method name="edit*" propagation="REQUIRED" />
<tx:method name="delete*" propagation="REQUIRED" />
<tx:method name="remove*" propagation="REQUIRED" />
<tx:method name="repair" propagation="REQUIRED" />
<tx:method name="delAndRepair" propagation="REQUIRED" />
<tx:method name="get*" propagation="SUPPORTS" />
<tx:method name="find*" propagation="SUPPORTS" />
<tx:method name="load*" propagation="SUPPORTS" />
<tx:method name="search*" propagation="SUPPORTS" />
<tx:method name="datagrid*" propagation="SUPPORTS" />
<tx:method name="*" propagation="SUPPORTS" />
</tx:attributes>
</tx:advice> <aop:config>
<!-- 配置所有的Advice,使用正则表达式,配置所有类,所有返回值的方法 -->
<aop:pointcut id="transactionPointcut"
expression="execution(* zhu.service..*Impl.*(..))" />
<aop:advisor pointcut-ref="transactionPointcut"
advice-ref="transactionAdvice" />
</aop:config> <!-- 配置druid监控spring jdbc -->
<bean id="druid-stat-interceptor"
class="com.alibaba.druid.support.spring.stat.DruidStatInterceptor"></bean>
<bean id="druid-stat-pointcut" class="org.springframework.aop.support.JdkRegexpMethodPointcut"
scope="prototype">
<property name="patterns">
<list>
<value>zhu.service.*</value>
</list>
</property>
</bean> <aop:config>
<aop:advisor advice-ref="druid-stat-interceptor"
pointcut-ref="druid-stat-pointcut" />
</aop:config></beans>
spring-mybatis.xml
数据库的表
创建表:
USE jdbc01;
CREATE TABLE tbdept(
did INT PRIMARY KEY AUTO_INCREMENT,
dname VARCHAR(40),
)ENGINE=INNODB DEFAULT CHARSET=utf8;
新增数据
INSERT INTO tbdept ( dname ) VALUES ( 'A部门' );
INSERT INTO tbdept ( dname ) VALUES ( 'B部门' );
INSERT INTO tbdept ( dname ) VALUES ( 'C部门' );
2):代码
- a):po层

package zhu.po;public class Tbdept {
private Integer did; private String dname; public Integer getDid() {
return did;
} public void setDid(Integer did) {
this.did = did;
} public String getDname() {
return dname;
} public void setDname(String dname) {
this.dname = dname;
}
}
Tbdept.java
- b):mapper(映射)

<?xml version="1.0" encoding="UTF-8" ?>
<!DOCTYPE mapper PUBLIC "-//mybatis.org//DTD Mapper 3.0//EN" "http://mybatis.org/dtd/mybatis-3-mapper.dtd" ><!--namespace命令空间,作用就是对sql进行分类化管理,理解sql隔离
注意:使用mapper代理方法开发,namepace有特殊重要的作用
-->
<mapper namespace="zhu.dao.TbempMapper" >
<resultMap id="BaseResultMap" type="zhu.po.Tbdept" >
<id column="did" property="did" jdbcType="INTEGER" />
<result column="dname" property="dname" jdbcType="VARCHAR" />
</resultMap>
<sql id="Base_Column_List" >
did, dname
</sql>
<select id="query_tbDept" resultType="zhu.po.Tbdept" >
SELECT did,dname FROM tbdept
</select></mapper>
TbdeptMapper.xml
- c):dao层

package zhu.dao;import java.util.List;import org.springframework.stereotype.Repository;import zhu.po.Tbdept;@Repository(value = "tbemdao")
public interface TbempMapper { List<Tbdept> query_tbDept ();}
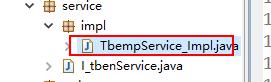
- d):service

package zhu.service;import java.util.List;import zhu.po.Tbdept;public interface I_tbenService {
List<Tbdept> query_tbDept ();
}
package zhu.service.impl;import java.util.List;import javax.annotation.Resource;import org.springframework.stereotype.Service;import zhu.dao.TbempMapper;
import zhu.po.Tbdept;
import zhu.service.I_tbenService;@Service
public class TbempService_Impl implements I_tbenService { @Resource(name="tbemdao")
private TbempMapper my_tbemp; @Override
public List<Tbdept> query_tbDept() {
// TODO Auto-generated method stub
return my_tbemp.query_tbDept();
}}
- f):web

package zhu.web;import java.io.IOException;
import java.io.PrintWriter;
import java.util.List;import javax.servlet.ServletException;
import javax.servlet.http.HttpServletResponse;import net.sf.json.JSONObject;import org.springframework.beans.factory.annotation.Autowired;
import org.springframework.stereotype.Controller;
import org.springframework.web.bind.annotation.RequestMapping;
import org.springframework.web.bind.annotation.ResponseBody;import zhu.po.Tbdept;
import zhu.service.I_tbenService;@Controller
@RequestMapping("/Binding_Cbo")
public class Binding_Cbo { @Autowired
private I_tbenService my_TbenService; @RequestMapping(value="/android_cbo.json",produces="application/json")
public void android_cbo(HttpServletResponse response)throws ServletException, IOException{
JSONObject json = new JSONObject();
PrintWriter writer = response.getWriter();
List<Tbdept> cbo_bm= my_TbenService.query_tbDept();
json.put("cbo_bm", cbo_bm);
writer.write(json.toString());
writer.close();
}
}
然后检查一下 是否能成功 运行

三:Android studio
- a);先进行准备前工作先 在build.gradle四个地方要加入代码

// Top-level build file where you can add configuration options common to all sub-projects/modules.buildscript {
repositories {
jcenter()
// add plugin
}
dependencies {
classpath 'com.android.tools.build:gradle:2.3.3'
classpath 'org.greenrobot:greendao-gradle-plugin:3.2.2' // add plugin
// NOTE: Do not place your application dependencies here; they belong
// in the individual module build.gradle files
}
}allprojects {
repositories {
jcenter()
}
}task clean(type: Delete) {
delete rootProject.buildDir
}
build.gradle
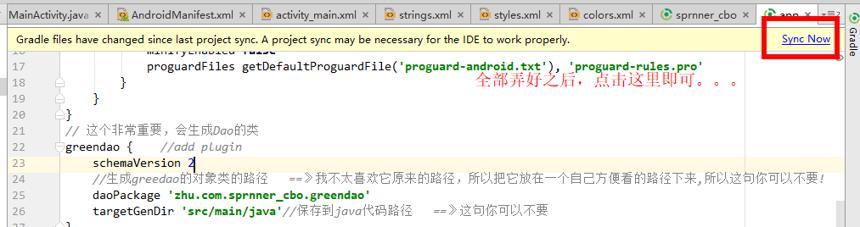
~~~~~~~~~~~~~~~~~~~~~~~~~~~~~~~~~~~~~~~~~~~~~~~~~~~~~~~~~~~~~~~~~~~~~~~~~~~~~~~~~~~~~~~~~~~~~~~~~~~~~~~~~~~~~~~~~~~~~~~~~~~~~~~~~~~~~~~~~~~~~~~~~~~~~~~~

~~~~~~~~~~~~~~~~~~~~~~~~~~~~~~~~~~~~~~~~~~~~~~~~~~~~~~~~~~~~~~~~~~~~~~~~~~~~~~~~~~~~~~~~~~~~~~~~~~~~~~~~~~~~~~~~~~~~~~~~~~~~~~~~~~~~~~~~~~~~~~~~~~~~~~~~
// 这个非常重要,会生成Dao的类
greendao { //add plugin
schemaVersion 2
//生成greedao的对象类的路径
设置DaoMaster,DaoSession,Dao包的路径,我不太喜欢它原来的路径,每次找都很麻烦,所以把它放在一个自己方便看的路径下来,你也可以不要下面这两句!
daoPackage 'zhu.com.sprnner_cbo.greendao'
targetGenDir 'src/main/java'//保存到java代码路径 ==》这句你可以不要
}

如果没有这俩句,那么DaoMaster,DaoSession,Dao的原路径是在这里的

有这俩句,那么DaoMaster,DaoSession,Dao那么路径挺好找的

~~~~~~~~~~~~~~~~~~~~~~~~~~~~~~~~~~~~~~~~~~~~~~~~~~~~~~~~~~~~~~~~~~~~~~~~~~~~~~~~~~~~~~~~~~~~~~~~~~~~~~~~~~~~~~~~~~~~~~~~~~~~~~~~~~~~~~~~~~~~~~~~~~~~~~~~

apply plugin: 'com.android.application'
apply plugin: 'org.greenrobot.greendao'//add plugin
android {
compileSdkVersion 26
buildToolsVersion "26.0.1"
defaultConfig {
applicationId "zhu.com.sprnner_cbo"
minSdkVersion 19
targetSdkVersion 26
versionCode 1
versionName "1.0"
testInstrumentationRunner "android.support.test.runner.AndroidJUnitRunner"
}
buildTypes {
release {
minifyEnabled false
proguardFiles getDefaultProguardFile('proguard-android.txt'), 'proguard-rules.pro'
}
}
}
// 这个非常重要,会生成Dao的类
greendao { //add plugin
schemaVersion 2
//生成greedao的对象类的路径 ==》我不太喜欢它原来的路径,所以把它放在一个自己方便看的路径下来,所以这句你可以不要!
daoPackage 'zhu.com.sprnner_cbo.greendao'
targetGenDir 'src/main/java'//保存到java代码路径 ==》这句你可以不要
}
dependencies {
compile fileTree(dir: 'libs', include: ['*.jar'])
androidTestCompile('com.android.support.test.espresso:espresso-core:2.2.2', {
exclude group: 'com.android.support', module: 'support-annotations'
})
compile 'com.android.support:appcompat-v7:26.+'
compile 'com.android.support.constraint:constraint-layout:1.0.2'
compile 'com.loopj.android:android-async-http:1.4.9'// add library==》这个是添加 网络请求的插件
compile 'org.greenrobot:greendao:3.2.2' // add library ==>这个是 添加 greedao插件
testCompile 'junit:junit:4.12'
}
build.gradle
b):因为需要网络的请求 所以 要必须 要在AndroidManifest.xml加一句代码,不加就会出现下面这种错误的情况
12-26 02:45:25.969 5267-5334/zhu.com.sprnner_cbo W/System.err: java.net.SocketException: Permission denied
12-26 02:45:25.970 5267-5334/zhu.com.sprnner_cbo W/System.err: at java.net.Socket.createImpl(Socket.java:473)
12-26 02:45:25.970 5267-5334/zhu.com.sprnner_cbo W/System.err: at java.net.Socket.getImpl(Socket.java:536)
12-26 02:45:25.971 5267-5334/zhu.com.sprnner_cbo W/System.err: at java.net.Socket.setSoTimeout(Socket.java:1127)
12-26 02:45:25.971 5267-5334/zhu.com.sprnner_cbo W/System.err: at cz.msebera.android.httpclient.conn.scheme.PlainSocketFactory.connectSocket(PlainSocketFactory.java:116)
12-26 02:45:25.971 5267-5334/zhu.com.sprnner_cbo W/System.err: at cz.msebera.android.httpclient.conn.scheme.PlainSocketFactory.connectSocket(PlainSocketFactory.java:157)
12-26 02:45:25.971 5267-5334/zhu.com.sprnner_cbo W/System.err: at cz.msebera.android.httpclient.conn.scheme.SchemeSocketFactoryAdaptor.connectSocket(SchemeSocketFactoryAdaptor.java:65)
12-26 02:45:25.972 5267-5334/zhu.com.sprnner_cbo W/System.err: at cz.msebera.android.httpclient.impl.conn.DefaultClientConnectionOperator.openConnection(DefaultClientConnectionOperator.java:177)
12-26 02:45:25.972 5267-5334/zhu.com.sprnner_cbo W/System.err: at cz.msebera.android.httpclient.impl.conn.AbstractPoolEntry.open(AbstractPoolEntry.java:145)
12-26 02:45:25.972 5267-5334/zhu.com.sprnner_cbo W/System.err: at cz.msebera.android.httpclient.impl.conn.AbstractPooledConnAdapter.open(AbstractPooledConnAdapter.java:131)
12-26 02:45:25.972 5267-5334/zhu.com.sprnner_cbo W/System.err: at cz.msebera.android.httpclient.impl.client.DefaultRequestDirector.tryConnect(DefaultRequestDirector.java:611)
12-26 02:45:25.973 5267-5334/zhu.com.sprnner_cbo W/System.err: at cz.msebera.android.httpclient.impl.client.DefaultRequestDirector.execute(DefaultRequestDirector.java:446)
12-26 02:45:25.973 5267-5334/zhu.com.sprnner_cbo W/System.err: at cz.msebera.android.httpclient.impl.client.AbstractHttpClient.doExecute(AbstractHttpClient.java:860)
12-26 02:45:25.973 5267-5334/zhu.com.sprnner_cbo W/System.err: at cz.msebera.android.httpclient.impl.client.CloseableHttpClient.execute(CloseableHttpClient.java:82)
12-26 02:45:25.973 5267-5334/zhu.com.sprnner_cbo W/System.err: at com.loopj.android.http.AsyncHttpRequest.makeRequest(AsyncHttpRequest.java:146)
12-26 02:45:25.974 5267-5334/zhu.com.sprnner_cbo W/System.err: at com.loopj.android.http.AsyncHttpRequest.makeRequestWithRetries(AsyncHttpRequest.java:177)
12-26 02:45:25.974 5267-5334/zhu.com.sprnner_cbo W/System.err: at com.loopj.android.http.AsyncHttpRequest.run(AsyncHttpRequest.java:106)
12-26 02:45:25.974 5267-5334/zhu.com.sprnner_cbo W/System.err: at java.util.concurrent.Executors$RunnableAdapter.call(Executors.java:428)
12-26 02:45:25.974 5267-5334/zhu.com.sprnner_cbo W/System.err: at java.util.concurrent.FutureTask.run(FutureTask.java:237)
12-26 02:45:25.975 5267-5334/zhu.com.sprnner_cbo W/System.err: at java.util.concurrent.ThreadPoolExecutor.runWorker(ThreadPoolExecutor.java:1133)
12-26 02:45:25.975 5267-5334/zhu.com.sprnner_cbo W/System.err: at java.util.concurrent.ThreadPoolExecutor$Worker.run(ThreadPoolExecutor.java:607)
12-26 02:45:25.975 5267-5334/zhu.com.sprnner_cbo W/System.err: at java.lang.Thread.run(Thread.java:761)
错误情况


好了配置弄好剩下的就 很好解决了
c):代码
activity_main.xml
<?xml version="1.0" encoding="utf-8"?>
<RelativeLayout xmlns:android="http://schemas.android.com/apk/res/android"
xmlns:app="http://schemas.android.com/apk/res-auto"
xmlns:tools="http://schemas.android.com/tools"
android:layout_width="match_parent"
android:layout_height="match_parent"
tools:context="zhu.com.sprnner_cbo.MainActivity"> <Spinner
android:id="@+id/kj_spinner_tbmep"
android:layout_width="240dp"
android:layout_height="30dp"
android:layout_margin="5dp"
android:background="@drawable/etitext_frame_radiuo"
android:spinnerMode="dialog"
android:entries="@array/cbo_tbmep"
/></RelativeLayout>
activity_main.xml
d):设置实体类:
实体类 要根据返回的json中 相对于的key 一一对应
注意: 主键:id必须要设置Long的类型 ,切记 必须要加入 @Entity, 和@Id

设置好变量后 ,还有一个操作 设置 生成DaoMaster,DaoSession,Dao类的操作,这它就会自动补全我们实体类剩下的get和set的方法了
 ================生成的========》
最后在实体类中再加 一个方法 得到 从 服务器专递的json的数据
// 将json ==>转化为 Bean的对象(即Tb_Cbo_CLDL的对象)
public static Tbmep json_To_Bean(JSONObject object){
try {
return new Tbmep(object.getLong("did"),
object.getString("dname")
);
}catch (Exception e){ }
return null;
}
~~~~~~~~~~~~~~~~~~~~~~~~~~~~~~~~~~~~~~~~~~~~~~··
package zhu.com.sprnner_cbo;import org.greenrobot.greendao.annotation.Entity;
import org.greenrobot.greendao.annotation.Id;
import org.greenrobot.greendao.annotation.Generated;
import org.json.JSONObject;/**
* Created by XiaoZhu on 2017/12/14.
*/
@Entity
public class Tbmep {
@Id
private Long did;
private String dname; @Generated(hash = )
public Tbmep(Long did, String dname) {
this.did = did;
this.dname = dname;
}
@Generated(hash = )
public Tbmep() {
}
public Long getDid() {
return this.did;
}
public void setDid(Long did) {
this.did = did;
}
public String getDname() {
return this.dname;
}
public void setDname(String dname) {
this.dname = dname;
} // 将json ==>转化为 Bean的对象(即Tb_Cbo_CLDL的对象)
public static Tbmep json_To_Bean(JSONObject object){
try {
return new Tbmep(object.getLong("did"),
object.getString("dname")
);
}catch (Exception e){ }
return null;
}
}
MainActivity
package zhu.com.sprnner_cbo;import android.support.v7.app.AppCompatActivity;
import android.os.Bundle;
import android.util.Log;
import android.view.View;
import android.widget.AdapterView;
import android.widget.ArrayAdapter;
import android.widget.Spinner;
import android.widget.Toast;import com.loopj.android.http.AsyncHttpClient;
import com.loopj.android.http.AsyncHttpResponseHandler;import org.json.JSONArray;
import org.json.JSONException;
import org.json.JSONObject;import java.io.InputStream;
import java.util.ArrayList;
import java.util.List;import cz.msebera.android.httpclient.Header;
import cz.msebera.android.httpclient.HttpResponse;
import cz.msebera.android.httpclient.NameValuePair;
import cz.msebera.android.httpclient.client.entity.UrlEncodedFormEntity;
import cz.msebera.android.httpclient.client.methods.HttpPost;
import cz.msebera.android.httpclient.impl.client.DefaultHttpClient;
import cz.msebera.android.httpclient.message.BasicNameValuePair;public class MainActivity extends AppCompatActivity implements AdapterView.OnItemSelectedListener {
private Spinner btn_spinner_tbmep;
@Override
protected void onCreate(Bundle savedInstanceState) {
super.onCreate(savedInstanceState);
setContentView(R.layout.activity_main);
btn_spinner_tbmep = (Spinner) findViewById(R.id.kj_spinner_tbmep);
btn_spinner_tbmep.setOnItemSelectedListener(MainActivity. this);//成品尺寸
} /**
* 如果使用 类 实现==>这个的 implements AdapterView.OnItemSelectedListener
* ,那么就必须要复写下面这个方法onItemSelected()
* onNothingSelected()
* @param adapterView
* @param view
* @param i
* @param l
*/
@Override //成功干嘛
public void onItemSelected(AdapterView<?> adapterView, View view, int i, long l) {
switch (adapterView.getId()){
case R.id.kj_spinner_tbmep: //kj_spinner_tbmep ==>这个是 控件的 id名称
cbo_tbmep();
break;
}
}
@Override //不成功干嘛
public void onNothingSelected(AdapterView<?> adapterView) { } //==>这是系统自带的 下拉框
private List<String> list_Cbo_str=null;// 接受string的数据
List<Tbmep> list_cboBinding=null;//接收 TbCboCLDL对象的数据
ArrayAdapter<String> arrayAdapter=null;
int tbmepId=0;//接收ID
//访问后台的 封面纸张的 链接
public void cbo_tbmep(){
AsyncHttpClient client =new AsyncHttpClient();
//第一个参数是访问 后台的路径,第二是:参数根据 id获取 string 查询数据 ,第三个:回调函数
client.get("http://192.168.191.2:8080/2017_1214_cbo/Binding_Cbo/android_cbo.json", null, new AsyncHttpResponseHandler() {
@Override
public void onSuccess(int statusCode, Header[] headers, byte[] responseBody) {
if (statusCode==200){
try {
JSONObject object = new JSONObject(new String(responseBody));//获取json数据
JSONArray jsonArray = object.getJSONArray("cbo_bm");//获取数据集名称为obj的数据
Log.d("jsonArray数据输出:", String.valueOf(jsonArray));
list_cboBinding = new ArrayList<>();
for(int i=0;i<jsonArray.length();i++){
//把 json 转换为 ==》bean的对象形式
Tbmep cbo=Tbmep.json_To_Bean(jsonArray.getJSONObject(i));
if (cbo!=null){
list_cboBinding.add(cbo);//把对象放入 list的数组中
}
}
//判断是否有数据
if (jsonArray.length() > 0) {
list_Cbo_str = new ArrayList<>();
for (int i = 0; i < list_cboBinding.size(); i++) {
Tbmep section = list_cboBinding.get(i);
list_Cbo_str.add(section.getDname());
}
//1.为下拉列表定义一个数组适配器,这个数组适配器就用到里前面定义的list。装的都是list所添加的内容 android.R.layout.simple_spinner_item==》这是系统本来就有的哦
arrayAdapter = new ArrayAdapter<>(MainActivity.this, android.R.layout.simple_spinner_item, list_Cbo_str);
//2.为适配器设置下拉菜单样式。android.R.layout.simple_list_item_single_choice==》Android系统自带样式
arrayAdapter.setDropDownViewResource(android.R.layout.simple_list_item_single_choice);
//3.以上声明完毕后,建立适配器,有关于sipnner这个控件的建立。用到kj_user_fm_spinner_papers2
btn_spinner_tbmep.setAdapter(arrayAdapter);
//4.为下拉列表设置各种点击事件,以响应菜单中的文本item被选中了,用setOnItemSelectedListener
btn_spinner_tbmep.setOnItemSelectedListener(new Spinner.OnItemSelectedListener() {//选择item的选择点击监听事件
public void onItemSelected(AdapterView<?> parent, View view, int position, long id) {
tbmepId=0;
tbmepId =list_cboBinding.get((int) id).getDid().intValue();//获取id
arrayAdapter.getItem(position);//==》获取选择的项目名称
}
public void onNothingSelected(AdapterView<?> parent ) {
}
}); }
}
catch (JSONException e) {
Toast.makeText(MainActivity.this, "下拉框加载失败!", Toast.LENGTH_SHORT).show();
}
}else if(statusCode==400){
Toast.makeText(MainActivity.this, "若返回值400,则是返回网络异常!", Toast.LENGTH_SHORT).show();
}
} @Override
public void onFailure(int statusCode, Header[] headers, byte[] responseBody, Throwable error) {
Toast.makeText(MainActivity.this, "请求网络失败!", Toast.LENGTH_SHORT).show();
}
}) ;
}}
好了,上面的就是我 绑定Android下拉框所有的代码了
运行时必须要先运行后台服务器,要不根本跑不起来,还有如果使用真机必须要使用同一个wifi
运行效果:

因为每次想下载的时候CSDN都要资源分而我刚好没有,所以我把我这次的源码放到了CSDN上。。。。上面的代码是已经齐的了,如果实在不想下载,那你可以去我之前的http://www.cnblogs.com/zhu520/p/7883273.html 下载 ssm ,去 里面找 jar 即可
源码:http://download.csdn.net/download/qq_35812301/10174004


